I can honestly say that I did not have “Buy a Gaming Laptop” on my 2025 bingo yet here we are. Meet my new Acer Predator Helios Neo 16 (how do people come up with such extravagant names?)
(more…)Category: PC
-

A distress call from Seagate
Earlier this year I turned on my Seagate external hard drive and was greeted with a continuous beeping sound. Could this be my very first experience with hard drive failure?
(more…) -

And now itΓÇÖs time for Linux
I’d always said I was not a hardware guy, that I preferred working with applications leaving someone else with the responsibility for the machines that ran them. Then one day I found myself salvaging an old video card to install onto a new PC. Granted, it was a Dell PC so its modular nature made things a lot easier.
I still don’t consider myself a hardware guy but am no longer completely abhorrent to the idea. I now find myself in a similar place with regards to server management and, more generally, Linux.
(more…) -
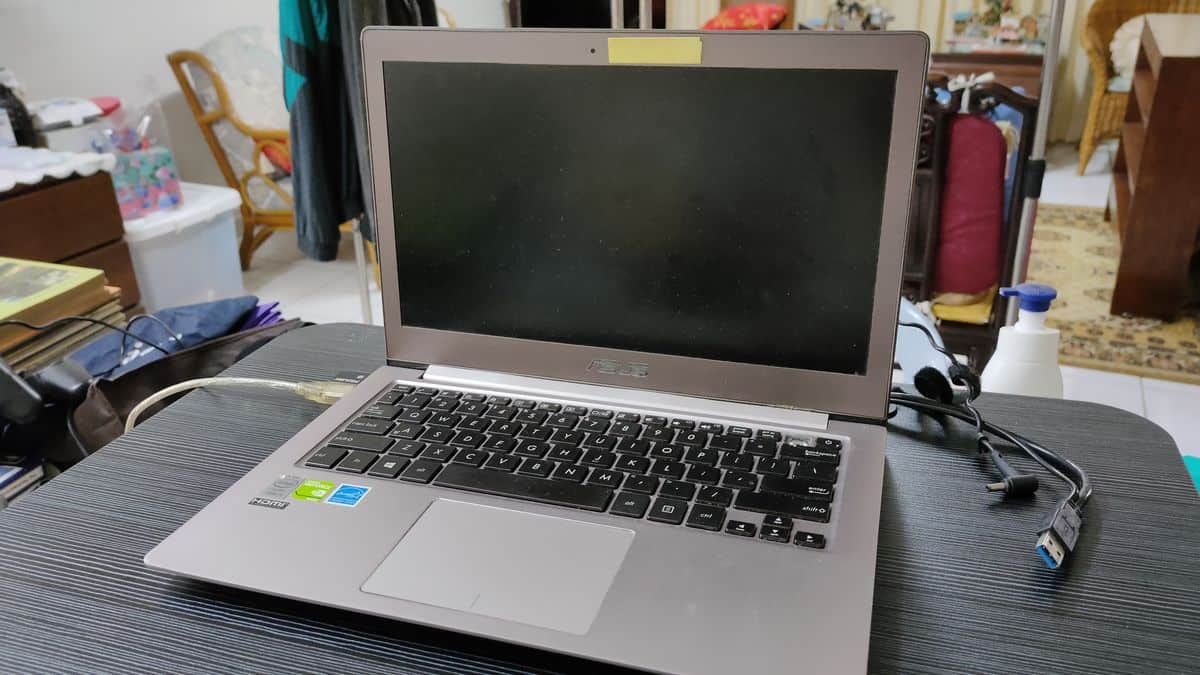
And now the hero may rest
This is my Asus Zenbook UX 303. I bought it in 2015 when I desperately needed a new laptop. Prior to that I was using a Dell Inspiron 700m running Windows XP (which still works!) but it was getting harder to do web development work on it.
I look fondly upon my Zenbook because we went through our own trials at about the same time. I purchased it during a difficult patch in my life when my energies were directed elsewhere and I didnΓÇÖt want to deal with buying a new laptop. IΓÇÖd been aware of the Zenbook lineΓÇÖs release which elicited a deep desire to buy one but I put that thought out of mind once I saw the price tag.
So when I saw a good cash-only deal at a local shop I jumped at the chance to replace my aging Dell. It was the first big purchase IΓÇÖd made in a while and I allowed myself to satisfy the fleeting need for an emotional high.
I will admit to buyers remorse, not immediately after but some time later. At the time, I thought had I sat myself down and done a bit more research I could have possibly gotten another laptop (probably a Dell) with similar specs at a cheaper price. The heart wants what the heart wants but once satisfied it may start wanting other things.

My ZenbookΓÇÖs sleek exterior and sexy colour reproduction received envious compliments from friends but inside it was struggling to run Windows 8 on what IΓÇÖd thought was an SSD but was actually a normal hard drive. I could get my work done, and it was leagues better than my faithful Dell Inspiron, but apps would lag nipping at my dwindling patience. I gave up on Firefox and put up with Chrome despite it being slow-as-molasses. Forget IDEs, it was text-editor all the way.
And then the hinge started giving me problems. I had just collected my Zenbook from the service center after getting a new hard drive (SSDs were still too expensive for me) when I noticed the right hinge sticking out. I promptly brought it back where they kept it for a few more days to patch it up. They couldnΓÇÖt replace it, I canΓÇÖt remember why, and the patch job left my Zenbook scarred ΓÇö the Delete button was cracked beyond repair, the Backspace button had a deep gash and the monitor bezels had smudges I could not erase.
Despite the scars, my Zenbook still worked and kept going. And thatΓÇÖs also how I feel about myself when I think back to this period. Life doesnΓÇÖt just stop to allow us time to heal, we have to somehow muster enough wherewithal to keep going while we lick our wounds.

In 2019, circumstances were improving for me and I had the luxury to think about how to better things in my life. My Zenbook came to mind almost immediately. SSD prices were falling and this would be a great opportunity to extend its life. I was also able to upgrade to 12GB of RAM and experienced the closest thing to computing bliss.
A year later the battery gave out. This was during the start of the global COVID restrictions which mangled supply lines the world over. I somehow managed to get an after-market battery but it was after months of literally bringing an extension cord everywhere my laptop went. The new battery doesnΓÇÖt have the same capacity as the old but I was glad it worked.
Maybe it was my own paranoia or maybe Life was giving me a nudge but in the first quarter of 2021 I began to be more concerned about the hinge. It was still working fine but the way the monitor would swing and flex at the slightest provocation made me uneasy. IΓÇÖd already been keeping an eye out for a new laptop for over a year since replacing the battery but global chip shortages meant the laptops that made it to our market did not meet my specifications. WhatΓÇÖs more, and in my opinion, they were grossly over-priced.
That all changed this week. A local seller had brought in a new batch of laptops that had what I was looking for. It was slightly more expensive than I would have liked but I consider it ΓÇ£COVID taxΓÇ¥. I quickly reserved a unit and within 24 hours theyΓÇÖd all been booked.
So here I am, typing this out on my Lenovo Ideapad Slim 5 Pro. I spent the past couple of days setting it up and transferring files so now this baby is ready to rock and roll.
A few years ago I adopted some tenants of minimalism. It wasnΓÇÖt a complete overhaul of my life but rather some minor changes, things as small as taking better care of my shoes so they last longer and wearing t-shirts until they are worn out. It has given me a better respect for the things I own and also a deep sense of gratitude for how they have improved my life.
It is no different with my Zenbook. It has paid for itself at least 10 times over and despite setbacks managed to keep up with me every step of the way. In every way, it has been a hero and now comes the time for it to rest, or rather ΓÇ£retireΓÇ¥. It now sits on my bedroom table where it will effectively function as a desktop hooked up to an external monitor. Hopefully this will put less stress on the hinge and allow it to continue to function for many more years. Thanks to the SSD and additional RAM, it is still very responsive.
Thank you, friend, for all your service. You did good.

-
Run Cobian Backup when PC is in sleep mode
How do you run Cobian Backup when your PC is in sleep mode? ItΓÇÖs actually not that difficult.
The TL;DR version is that we will be using Windows’ Task Scheduler to start the Cobian Backup task from the command line. For reference I am using Cobian Backup version 11.2.0.582 (the latest and possibly last available version) on Windows 10.
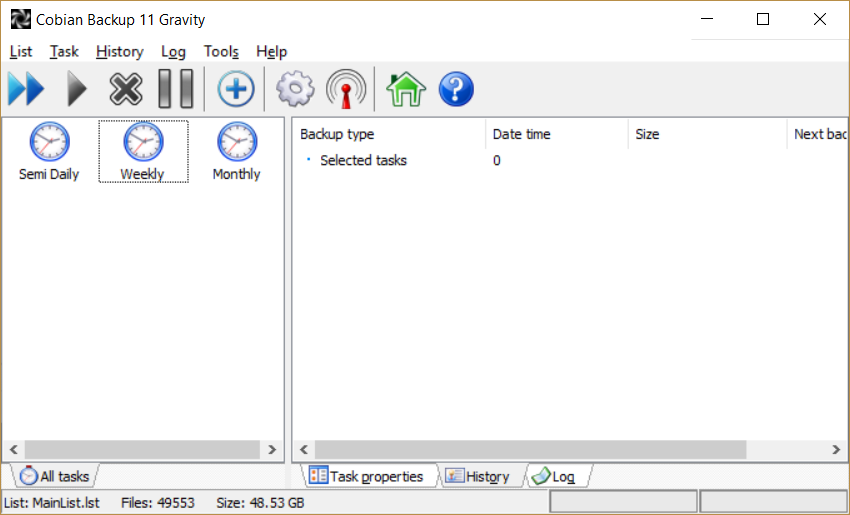
Cobian Backup has been my desktop backup application of choice for years now. It lets me create scheduled backups of my PC files and saves it to two different external hard disks. And that’s really all I need.
So letΓÇÖs get started: here are the steps to run Cobian Backup when your PC is asleep.
0) (Windows 8 & 10) Install Cobian Backup
This is an additional step for Windows 8 & 10 users. If your experience mirrored my own you tried installing Cobian Backup when you moved to Windows 8 or 10 and got an error. Well the good news is that Cobian Backup works just fine on Windows 8 and 10 though you may need to
activate/install the .NET 3.5 framework in order to be able to use Volume Shadow Copies
. Follow the previous link for further instructions.1) Create your backup tasks in the Cobian Backup interface as per usual
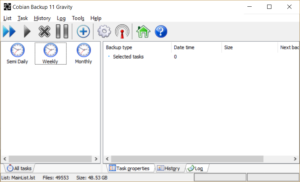
This step is self-explanatory. Launch the Cobian Backup interface (
cbInterface.exe) and create your backup tasks as you normally would.Make sure the tasks are enabled. After going through all these steps I made the mistake of disabling the tasks in the Cobian Backup interface thinking that I no longer needed them enabled. I was wrong.
As an added step, make sure you set each task to Manual. This will prevent the task from automatically running.
2) Open
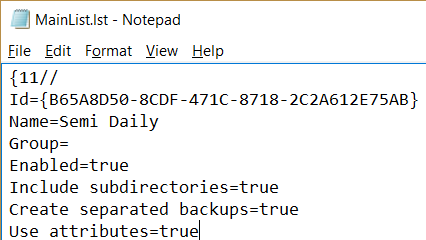
MainList.lstin your favourite text editor (Notepad is fine too)Locate the
MainList.lstfile. Assuming you installed Cobian Backup in the default directory of Program Files then the complete path to the file would be C:\Program Files (x86)\Cobian Backup 11\DB\MainList.lst. Open the file up in any text editor.For those wondering,
MainList.lstcontains all the settings for each task created in the Cobian Backup interface earlier.3) Record the Id for each task
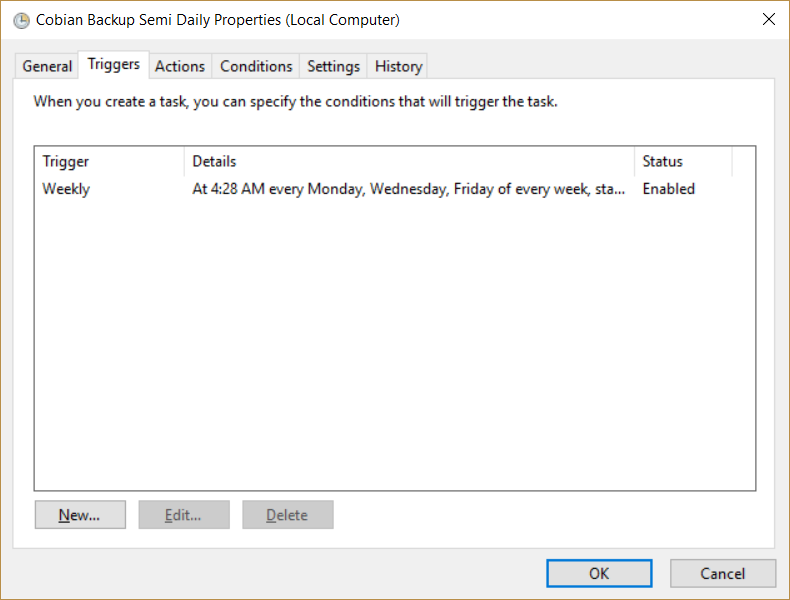
Here’s where you’ll need pen-and-paper handy (or your favourite text editor since it’s already open) because we’re going to record the Id of each task you want to run. The easiest way is to do a search for the task name. The Id is right above it.
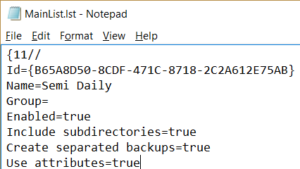
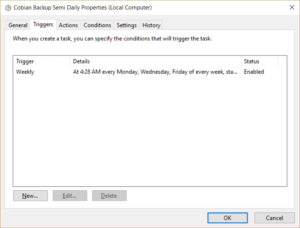
In the image above you can see I created a task called “Semi Daily” and it was assigned a task Id of {B65A8D50-8CDF-471C-8718-2C2A612E75AB}. Record this down (yes, including the curly braces).
Record the Id for every task you want to run.
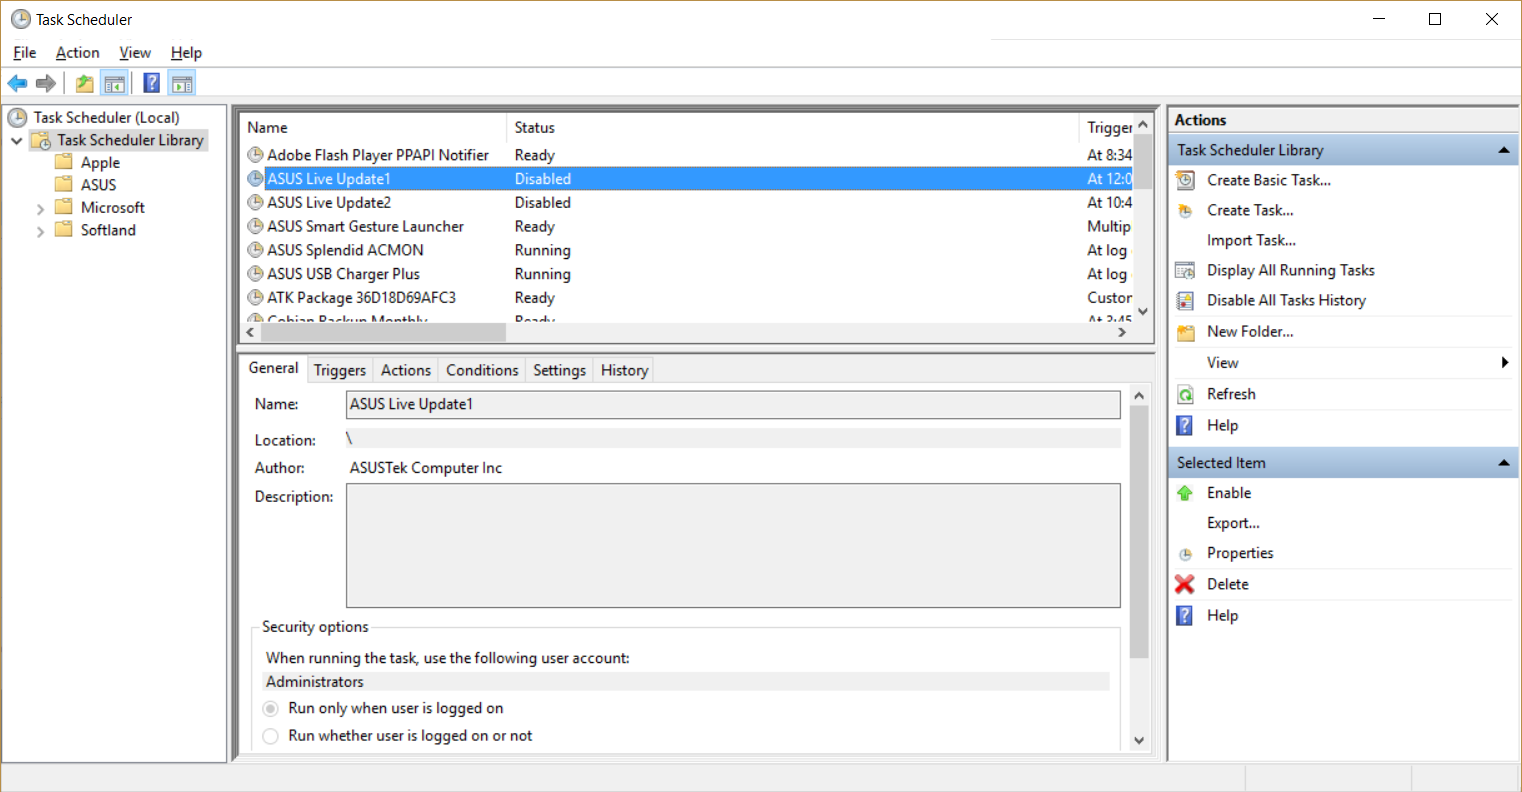
4) Launch Windows Task Scheduler
The Windows Task Scheduler is located in Control Panel > Administrative Tools. Or you can search for ΓÇ£Task SchedulerΓÇ¥ in Windows Search.
Either way, launch the application.
5) Create a Windows task
OK, here is the meat and potatoes of everything. Follow these steps:
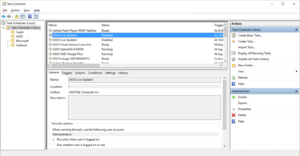
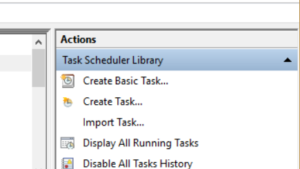
- In the left-most column of the Task Scheduler, click ΓÇ£Task Scheduler LibraryΓÇ¥.

- In the Actions panel (usually the right-most column of the Task Scheduler), click “Create Task…”. Note: do not click “Create Basic Task…”
- When the Create Task dialog appears, give your task a name (Something like “Cobian Backup Monthly”).
- Click the ΓÇ£TriggersΓÇ¥ tab.
- Click ΓÇ£NewΓÇ¥ to create a new Trigger.
- In the Edit Trigger dialog, click the menu next to “Begin the task:” and select “On a schedule”.
- Now go through the Settings. This is where you will set the schedule for the task. Set the schedule you need.
- Now go through the Advanced settings. Make sure Enabled is ticked. For the other options you can choose to tick them depending on your situation.
- Click OK to close the Edit Trigger dialog. You should see your new Trigger added to the list of Triggers.
- We’re now back in the Create Task dialog. Click the “Actions” tab.
- Click ΓÇ£NewΓÇ¥ to create a new Action.
- In the New Action dialog, click the menu next to “Action:” and select “Start a program”.
- Under Settings, click the “Browse” button.
- Locate the program
cobian.exe. If you installed Cobain Backup in the default directory it would be located atC:\Program Files (x86)\Cobian Backup 11\cobian.exe. - Click OK to confirm you want to launch
cobian.exe. - For the field “Add arguments (optional):”, you will need to enter
-tasks:TASK_ID -noguibut replace TASK_ID with your actual task Id. For example, I would type enter this: -tasks:{B65A8D50-8CDF-471C-8718-2C2A612E75AB} -nogui - Click OK to close the Edit Action dialog. You should now see your new Action added to the list of Actions.
- Click the ΓÇ£ConditionsΓÇ¥ Tab.
- Now this is important: Under “Power” tick the box “Wake the computer to run this task”.
- Go through the other options in the ΓÇ£ConditionsΓÇ¥ Tab. Set any of them according to your needs. Usually I tick ΓÇ£Start the task only if the computer is on AC powerΓÇ¥ and ΓÇ£Stop if the computer switches to battery powerΓÇ¥.
- Click the ΓÇ£SettingsΓÇ¥ Tab.
- Again, go through the options in this tab and set any of them according to your needs.
- Click OK.
6) Prevent the Cobian Backup Interface from auto-starting with Windows
Now we need to stop the Cobian Backup Interface from auto-starting every time you log into Windows. We need to do this because, at least from my experience, the Windows tasks we created will not run if the Cobian Backup Interface is running.
Hold
Ctrl+Shiftand pressEsc. ThisΓö¼├íwill bring up the Task Manager. Look for ╬ô├ç┬úCobian backup 11 Gravity – Interface╬ô├ç┬Ñ. IfΓö¼├íit╬ô├ç├ûs not there, you don╬ô├ç├ût have to do anything. If it is there, check the Status column to see if it has already been disabled. If it hasn╬ô├ç├ût, right-click it and select ╬ô├ç┬úDisable╬ô├ç┬Ñ.If you have the Cobian Backup Interface currently running, you should also close it.
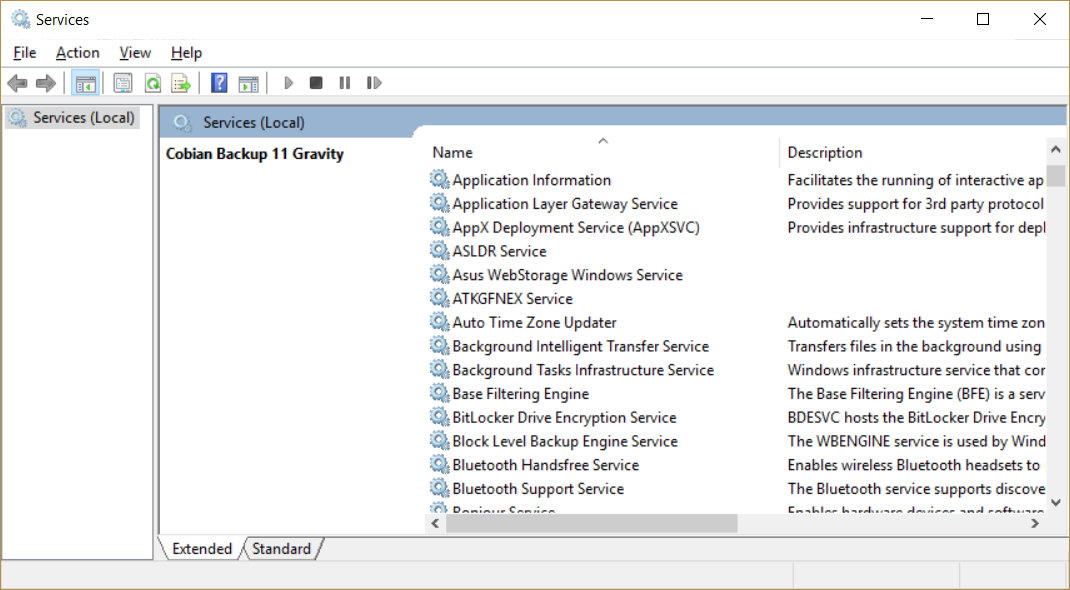
7) Stop and Disable the Cobian Backup 11 Gravity service
Cobian Backup usually also installs a Windows Service that auto-starts every time you log into Windows. WeΓÇÖre going to need to disable this fella too or it will prevent the Windows tasks from running.
Hold down the Windows key on your keyboard and press
R. This will launch the Run dialog. Type inservices.mscand click OK. This will launch the Services dialog.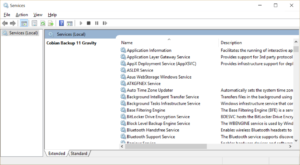
Double-click the service named ΓÇ£Cobian Backup 11 GravityΓÇ¥. In the dialog that appears, click ΓÇ£StopΓÇ¥ to stop the service. Next to ΓÇ£Startup type:ΓÇ¥, select Disable. Click OK to confirm the changes.
Note that you may also have another service called “Cobian Backup 11 Volume Shadow Copy Requester”. It is probably running and auto-starts by default. Do not touch this service.
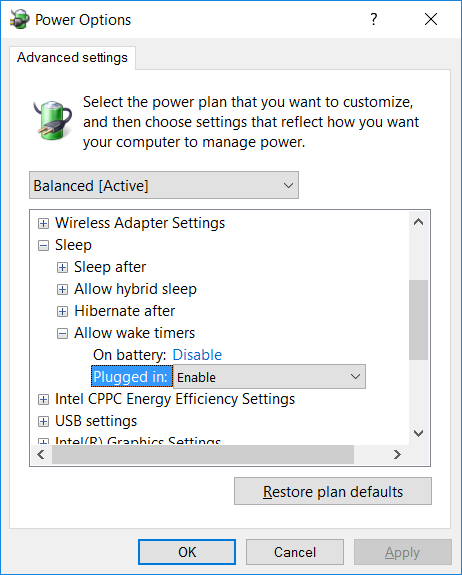
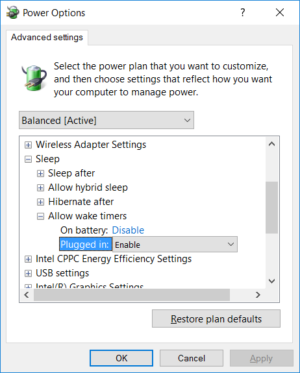
8) (Windows 10) Enable All Wake Timers
Depending on your installation of Windows 10, your Scheduled Task may not run unless you manually enable all wake timers.
- Go to Control Panel > Hardware and Sound > Power Options.
- Click ΓÇ£Change plan settingsΓÇ¥ for your selected power plan.
- Click ΓÇ£Change advanced power settingsΓÇ¥.
- In the Power Options dialog, expand the tree menu for ΓÇ£SleepΓÇ¥.
- Now expand the tree menu for ΓÇ£Allow wake timersΓÇ¥.
- Expand the menu next to “Plugged in” and select Enable.
Finishing up
That’s it! A few things to remember:
- If you ever manually open up the Cobian Backup Interface, remember to close it or it will prevent your backups from running.
- Cobian Backup will not keep logs of the backups run (I havenΓÇÖt been able to get this to work) but the History tab will list the most recent times the backup tasks have taken place. However, logs are (kind of) kept by the Task Scheduler: open the task in question and check the History tab.
- If you want to read up on Cobian BackupΓÇÖs command line arguments, check the Help directory in your local installation. ThereΓÇÖs some information online but itΓÇÖs missing the (rather crucial)
tasksargument.
- In the left-most column of the Task Scheduler, click ΓÇ£Task Scheduler LibraryΓÇ¥.